

Set up your online store
Request online access, save the five setup steps, verify Stripe and understand what is still required before customers can buy.
Steps
- 1
Get online selling access
From My Account choose Set up my online store, or use the online-shop banner on Events. Approved online/both vendors enter Dashboard. If online access is not approved, submit the access request shown and wait for staff; buying a setup service does not grant approval.
Open online Dashboard → - 2
Choose self-service or optional team help
Dashboard displays optional setup packages and Your setup services. Your own setup and edits are free. Managed packages are one-time services and can be purchased again; provide your store/product details and images. Included team changes last one week after handoff, not after payment. Photos/copywriting are extra work. Disabled checkout should show its reason; never create duplicate payments to bypass it.
- 3
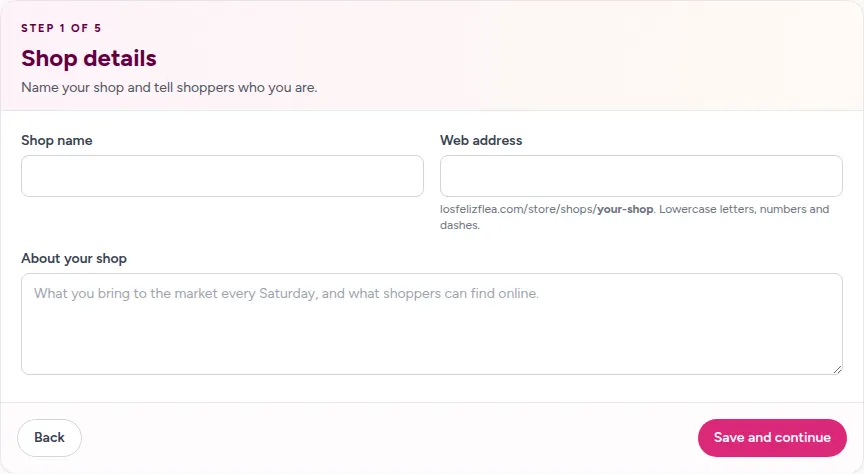
Save Shop details and appearance
Choose Shop setup. Complete Shop details, then Save and continue. On How it looks choose Market, Studio or Editorial, set the accent/branding and upload your own logo/banner. Use the progress indicator to revisit saved steps.
Open Shop setup → - 4
Save Shipping, pickup & policies
Offer at least one valid shipping rate or pickup option. Configure destinations, prices and optional free-shipping threshold; store/Saturday-market pickup need an address, state and instructions. Write a real shipping, returns and refund policy. Choose an explicit tax setting; manual rates must cover the configured destinations. Tax settings do not remove marketplace-facilitator or other legal obligations.
Open delivery setup → - 5
Complete Payouts with Stripe
In Payouts with Stripe, use Connect Stripe or the displayed onboarding/continue action. Complete Stripe’s hosted requirements and return to the app. Charges, payouts and vendor-paid-processing verification must all pass; merely opening or returning from onboarding does not complete the step.
- 6
Review and finish
Check the summary on Review and finish and save the final step. The server checklist must show setup complete before Products and Orders open. Changes to setup can reset that review. A saved shop alone does not unlock these sections.
- 7
Prepare for live selling
Submit products for admin approval and publish the eligible shop. Live sales also require marketplace activation, valid delivery/tax settings and verified Stripe readiness. Store access, setup completion, shop publication and product approval are separate checks. Use the dashboard’s actual readiness/error messages, not this tour, as the final authority.
Open Products when unlocked →
Good to know
- Do not mark policies or taxes complete with invented information just to advance the progress bar.
- Online-store customer accounts are separate from your vendor login. Test shopping with the shopper flow rather than sharing your vendor credentials.
Questions
Why are Products and Orders locked?
Your five setup steps, including verified Stripe connection and Final review, must be complete. The server rechecks readiness; a lost payout capability can lock tools again.
Does purchasing team setup make my store live?
No. It buys a service, not account approval, Stripe verification, product approval or marketplace activation.
Can Saturday pickup remove shipping?
Yes, if you explicitly offer it. It does not waive tax/commission or promise you attend every market; agree collection details with the buyer.
Related guides
Add and manage products
Build a product with photos, variants and stock, save a draft or submit for review, and manage featured listings.
Fulfill online orders and understand earnings
Process paid shipments and pickup orders, handle refunds/restocking deliberately, and read the seller reporting correctly.
Get help: tickets, text and voice
Reach support even before approval, open and reply to a ticket, or use the text/voice assistant with your chosen audio devices.